On this occasion we will try to create an application that has implemented Microservice Architecture using Kubernetes. To better illustrate how we will try to make it, we can look at the picture below.
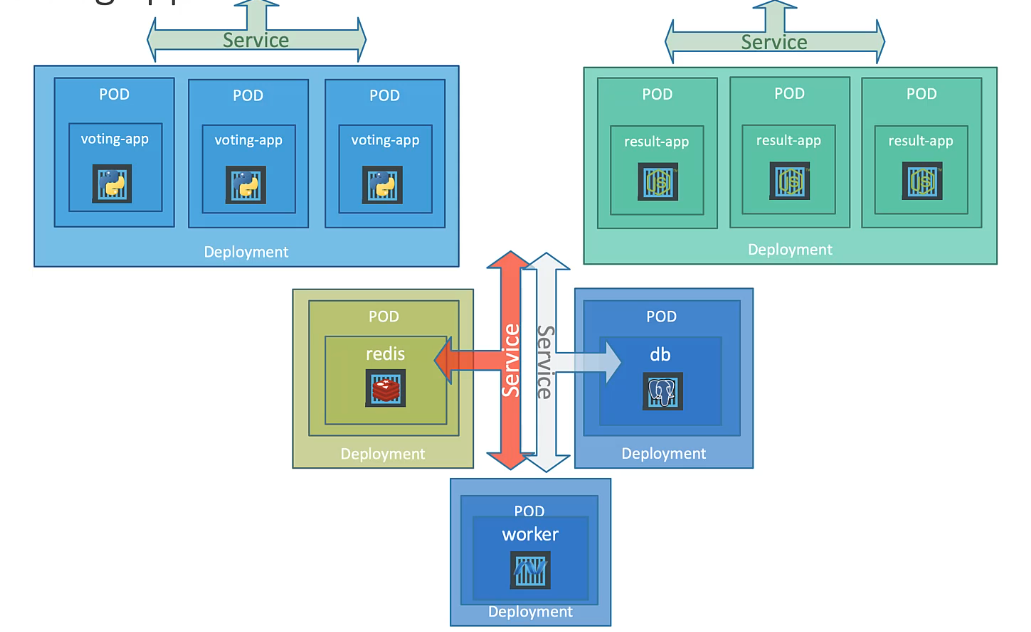
In the picture we can see that we have the applications voting-app, result-app and worker where the support for all these applications requires Redis as a cache and Postgre as storage data for each vote that will be carried out by the application.
The following is a more complete explanation:
- Voting-App: website used to carry out web-based voting
- Result-App: website that displays voting results in real time.
- Worker: background process application that synchronizes voting with live voting results.
- Redis: temporary storage mechanism used to support voting-app.
- Postgre: as permanent data storage which will later be used to display the results of all ongoing voting.
After we know all the functions of each Pod, we need to analyze what needs to be done if the application architecture is like this.
This microservice stage can be deployed into Kubernetes so it needs analysis to produce something like this:
- Deploy PODs: we analyze each service or application into individual Pods, namely: a. voting-app b. result-app c. workers d. Redis e. Postgres This stage means that later we will create Pods with each need.
- We create Services (ClusterIP) so that each service can communicate with Redis and Postgres. Why do we use ClusterIP? because we need to access Redis and Postgres from the application only using the cluster, not directly to a particular node. a. Redis b. Postgres
- Create services (NodePort) used for communication from applications to users so that later every website can be accessed by users. a. voitng-app b. result-app
We have imagined the stages so we will try to implement them in the form of a YAML file so we can understand better.
Create a Deployment
As explained above, the first step we need to do is make each POD into a YAML deployment file.
Create voting-app Deployments
We try to create a file with the name voting-app-deployment.yaml and fill the file as below.
 1apiVersion: apps/v1
 2kind: Deployment
 3metadata:
 4  name: voting-app-deployment
 5  labels:
 6    app: demo-voting-app
 7spec:
 8  replicas: 3
 9  selector:
10    matchLabels:
11      name: voting-app-pod
12      app: demo-voting-app
13  template:
14    metadata:
15      name: voting-app-pod
16      labels:
17        name: voting-app-pod
18        app: demo-voting-app
19
20    spec:
21      containers:
22      - name: voting-app
23        image: dockersamples/examplevotingapp_vote
24        ports:
25        - containerPort: 80
In this file we will replicate our service into 3 so that later we will see the voting-app service 3 Pods.
then next we create it with the command below
1➜ kubectl create -f code/demo/voting-app/voting-app-deployment.yaml
2pod/voting-app-deployment created
Create result-app Deployments
We continue by creating a file with the name result-app-deployment.yaml and fill the file with the code below.
 1apiVersion: apps/v1
 2kind: Deployment
 3metadata:
 4  name: result-app-deployment
 5  labels:
 6    app: demo-voting-app
 7spec:
 8  replicas: 1
 9  selector:
10    matchLabels:
11      name: result-app-pod
12      app: demo-voting-app
13  template:
14    metadata:
15      name: result-app-pod
16      labels:
17        name: result-app-pod
18        app: demo-voting-app
19
20    spec:
21      containers:
22      - name: result-app
23        image: dockersamples/examplevotingapp_result
24        ports:
25        - containerPort: 80
For the result-app service, we only make 1 replication because we don’t need to have a lot of requirements.
then continue create with this command
1➜ kubectl create -f code/demo/result-app/result-app-deployment.yaml
2pod/result-app-deployment created
Create a worker-app Deployment
We continue by creating a file with the name worker-app-deployment.yaml and fill the file with the code below.
 1apiVersion: apps/v1
 2kind: Deployment
 3metadata:
 4  name: worker-app-deployment
 5  labels:
 6    app: demo-voting-app
 7spec:
 8  replicas: 3
 9  selector:
10    matchLabels:
11      name: worker-app-pod
12      app: demo-voting-app
13  template:
14    metadata:
15      name: worker-app-pod
16      labels:
17        name: worker-app-pod
18        app: demo-voting-app
19
20    spec:
21      containers:
22      - name: worker-app
23        image: dockersamples/examplevotingapp_worker
We make the replication equal to 3 if we look at the YAML file. Then continue creating with this command
1➜ kubectl create -f code/demo/worker-app/worker-app-deployment.yaml
2pod/worker-app-deployment created
Create a Redis Deployment
This Redis deployment is used for temporary storage by creating the file below
 1apiVersion: apps/v1
 2kind: Deployment
 3metadata:
 4  name: redis-deployment
 5  labels:
 6    app: demo-voting-app
 7spec:
 8  replicas: 1
 9  selector:
10    matchLabels:
11      name: redis-pod
12      app: demo-voting-app
13  template:
14    metadata:
15      name: redis-pod
16      labels:
17        name: redis-pod
18        app: demo-voting-app
19
20    spec:
21      containers:
22      - name: redis
23        image: redis
24        ports:
25        - containerPort: 6379
Redis usually has a standard port, namely 6379, although in fact it can be any number, but to suit the application standards, we set it according to its needs.
then continue create with this command
1➜ kubectl create -f code/demo/redis/redis-deployment.yaml
2pod/redis-deployment created
Create a Postgres Deployment
These Postgres Pods are used for permanent storage of the final results of the voting app by creating the file below
 1apiVersion: apps/v1
 2kind: Deployment
 3metadata:
 4  name: postgres-deployment
 5  labels:
 6    app: demo-voting-app
 7spec:
 8  replicas: 1
 9  selector:
10    matchLabels:
11      name: postgres-pod
12      app: demo-voting-app
13  template:
14    metadata:
15      name: postgres-pod
16      labels:
17        name: postgres-pod
18        app: demo-voting-app
19
20    spec:
21      containers:
22      - name: postgres
23        image: postgres:9.4
24        ports:
25        - containerPort: 5432
26        env:
27          - name: POSTGRES_HOST_AUTH_METHOD
28            value: trust
We also set Postgres as a database with Port 5432 because Postgres defaults to using that port.
And we also add an environment such as a user and password that is used to connect to the Postgres database.
- POSTGRES_HOST_AUTH_METHOD = trust
then continue create with this command
1➜ kubectl create -f code/demo/postgres/postgres-deployment.yaml
2pod/postgres-deployment created
Create Services
There are two types of services that we will use in this application, namely ClusterIP and NodePort.
Cluster IP for Redis
We will create a ClusterIP service for Redis so that it can communicate with our voting application, namely with the code below.
 1apiVersion: v1
 2kind: Service
 3metadata:
 4  name: redis
 5  labels:
 6    name: redis-service
 7    app: demo-voting-app
 8spec:
 9  ports:
10  - port: 6379
11    targetPort: 6379
12  selector:
13    name: redis-pod
14    app: demo-voting-app
ClusterIP for Postgres
Create a ClusterIP for Postgres so that our service can communicate with the database. Below is the service YAML code that we need to create.
 1apiVersion: v1
 2kind: Service
 3metadata:
 4  name: db
 5  labels:
 6    name: db-service
 7    app: demo-voting-app
 8spec:
 9  ports:
10  - port: 5432
11    targetPort: 5432
12  selector:
13    name: postgres-pod
14    app: demo-voting-app
LoadBalancer for voting-app
The type in the voting-app is NodePort because we will establish the port for the user so we use NodePort. The following is the YAML file that we have to create.
 1apiVersion: v1
 2kind: Service
 3metadata:
 4  name: voting-service
 5  labels:
 6    name: voting-service
 7    app: demo-voting-app
 8spec:
 9  type: LoadBalancer
10  ports:
11  - port: 80
12    targetPort: 80
13  selector:
14    name: voting-app-pod
15    app: demo-voting-app
LoadBalancer for results-app
The type in the result-app is NodePort too because we will establish the port for the user so we use NodePort. The following is the YAML file that we have to create.
 1apiVersion: v1
 2kind: Service
 3metadata:
 4  name: result-service
 5  labels:
 6    name: result-service
 7    app: demo-voting-app
 8spec:
 9  type: LoadBalancer
10  ports:
11  - port: 80
12    targetPort: 80
13  selector:
14    name: result-app-pod
15    app: demo-voting-app
create all services with this command below.
1➜ kubectl create -f code/demo/postgres/postgres-service.yaml
2service/db created
3➜ kubectl create -f code/demo/redis/redis-service.yaml
4service/redis created
5➜ kubectl create -f code/demo/voting-app/voting-app-service.yaml
6service/voting-service created
7➜ kubectl create -f code/demo/result-app/result-app-service.yaml
8service/result-service created
if we want to see all services so, tried to typing this command.
 1➜ kubectl get all
 2NAME                                         READY   STATUS    RESTARTS   AGE
 3pod/postgres-deployment-7d47dd5bd8-hrsgq     1/1     Running   0          54s
 4pod/redis-deployment-58bdbddb55-6x4nk        1/1     Running   0          46s
 5pod/result-app-deployment-6ff54bbb5-9gz7q    1/1     Running   0          37s
 6pod/voting-app-deployment-5bd496ccd8-cmb5x   1/1     Running   0          28s
 7pod/voting-app-deployment-5bd496ccd8-nq4zl   1/1     Running   0          28s
 8pod/voting-app-deployment-5bd496ccd8-tqhwt   1/1     Running   0          28s
 9pod/worker-app-deployment-785b6c695d-28np4   1/1     Running   0          16s
10pod/worker-app-deployment-785b6c695d-2gfnz   1/1     Running   0          16s
11pod/worker-app-deployment-785b6c695d-gz7jx   1/1     Running   0          16s
12
13NAME                     TYPE           CLUSTER-IP      EXTERNAL-IP   PORT(S)        AGE
14service/db               ClusterIP      10.97.181.193   <none>        5432/TCP       51s
15service/kubernetes       ClusterIP      10.96.0.1       <none>        443/TCP        25d
16service/redis            ClusterIP      10.109.77.202   <none>        6379/TCP       44s
17service/result-service   LoadBalancer   10.100.125.49   <pending>     80:31289/TCP   34s
18service/voting-service   LoadBalancer   10.97.64.194    <pending>     80:31266/TCP   23s
19
20NAME                                    READY   UP-TO-DATE   AVAILABLE   AGE
21deployment.apps/postgres-deployment     1/1     1            1           54s
22deployment.apps/redis-deployment        1/1     1            1           46s
23deployment.apps/result-app-deployment   1/1     1            1           37s
24deployment.apps/voting-app-deployment   3/3     3            3           28s
25deployment.apps/worker-app-deployment   3/3     3            3           16s
26
27NAME                                               DESIRED   CURRENT   READY   AGE
28replicaset.apps/postgres-deployment-7d47dd5bd8     1         1         1       54s
29replicaset.apps/redis-deployment-58bdbddb55        1         1         1       46s
30replicaset.apps/result-app-deployment-6ff54bbb5    1         1         1       37s
31replicaset.apps/voting-app-deployment-5bd496ccd8   3         3         3       28s
32replicaset.apps/worker-app-deployment-785b6c695d   3         3         3       16s
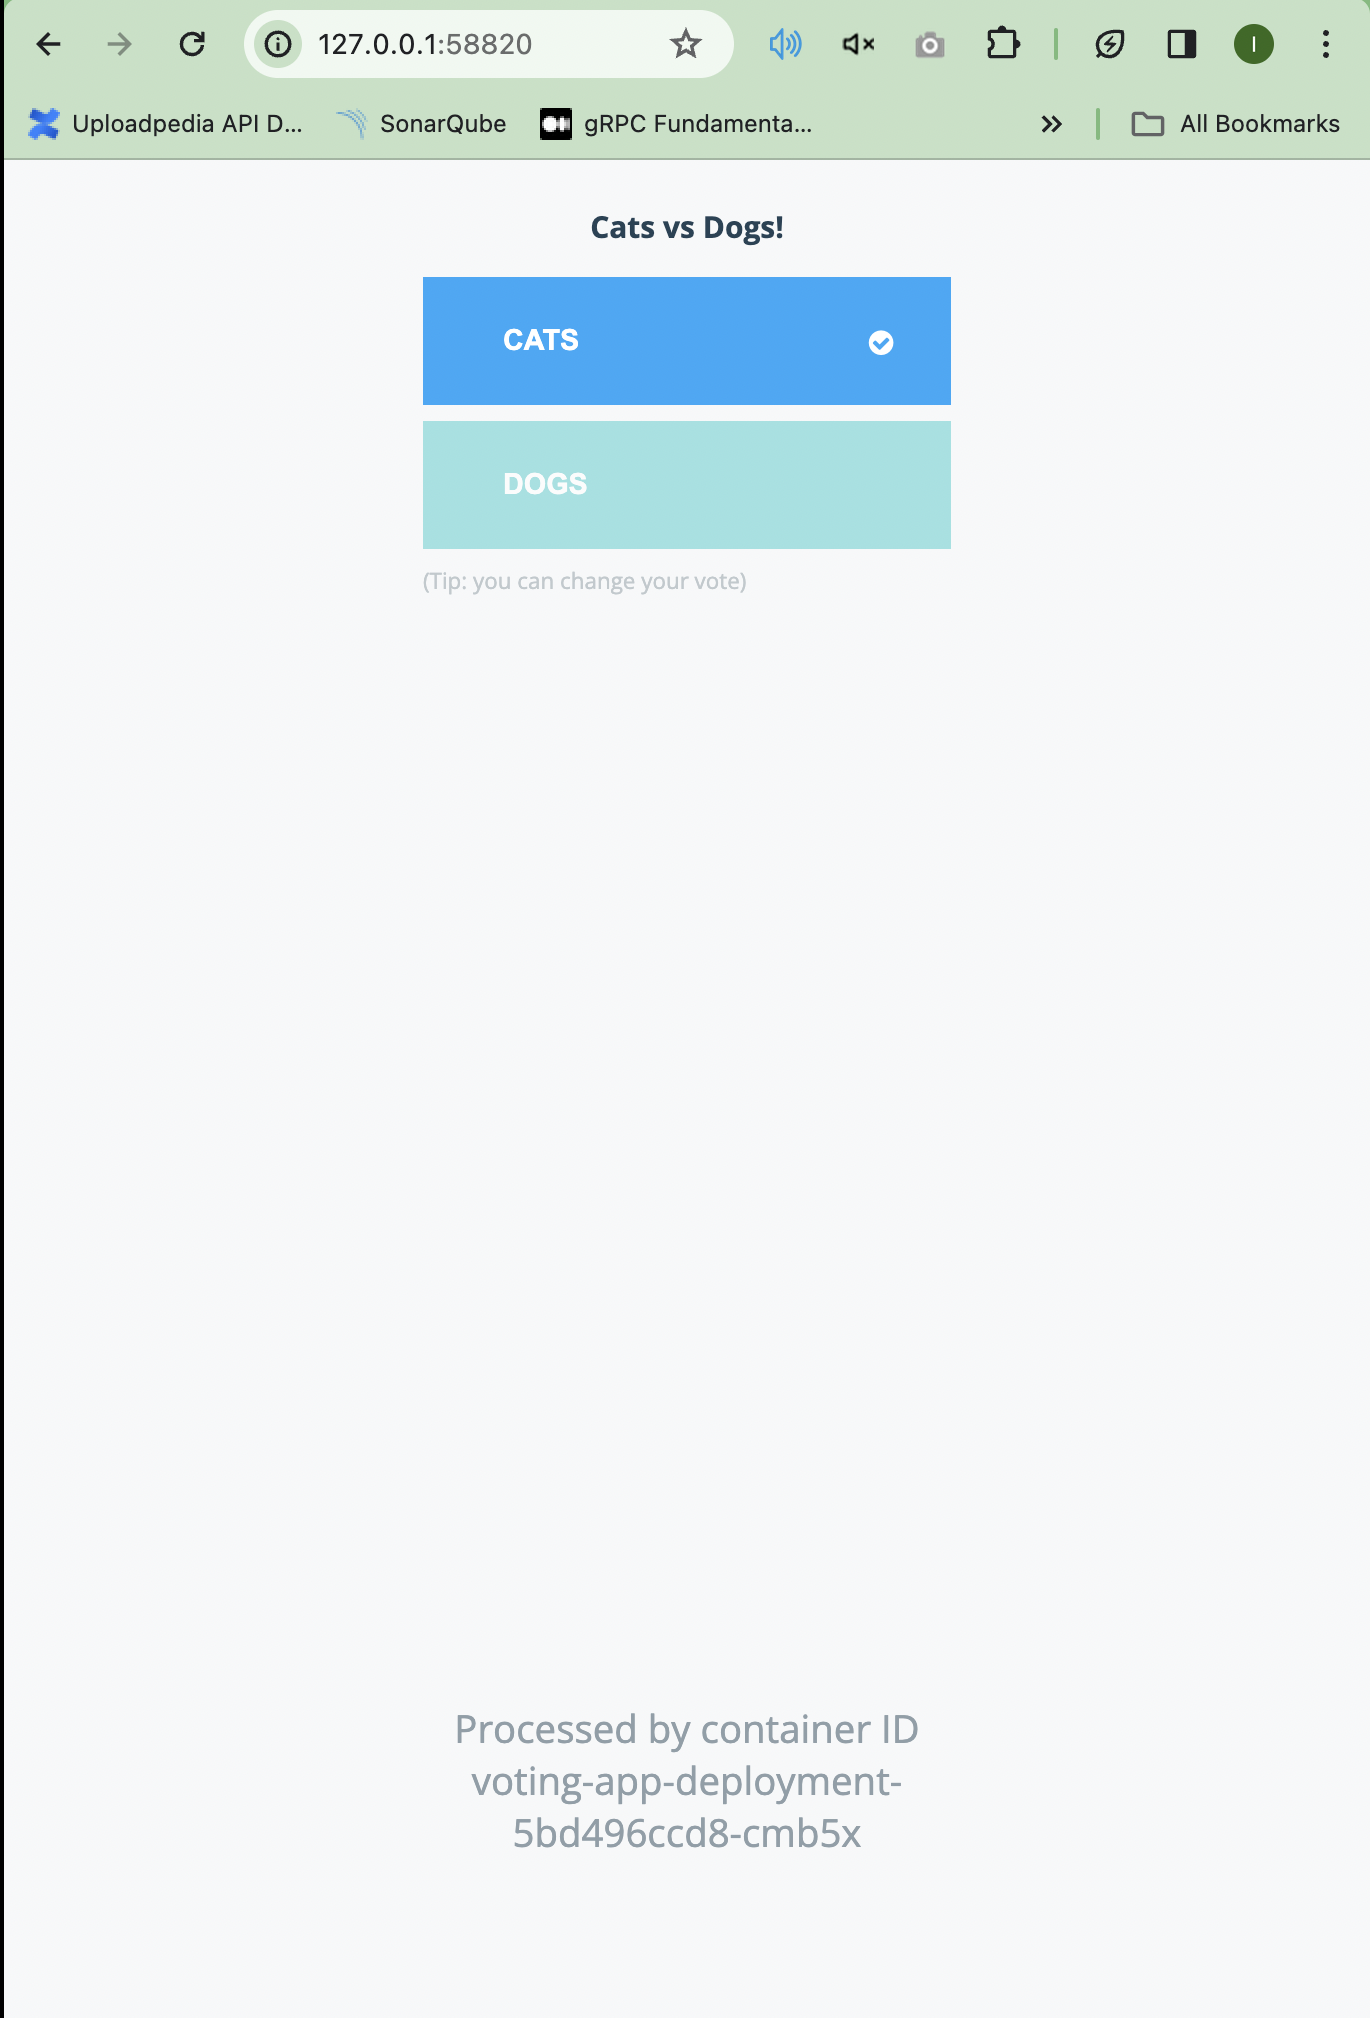
It can be seen that all services are running by looking at the Running status and so that we can try it in the browser we can use the command below for the voting-app service.
1➜ minikube service voting-service --url
2http://127.0.0.1:58820
3❗  Because you are using a Docker driver on darmoveStaleState removing state" podUID="b50bbc4f-004b-4d1f-86cf-db77a85b0f7d" containerName="redi
If we access it using a browser it will look like the image below.
And for the result-app service, we also need to look at the command below.
1➜ minikube service result-service --url
2http://127.0.0.1:58860
3❗  Because you are using a Docker driver on darwin, the terminal needs to be open to run it.
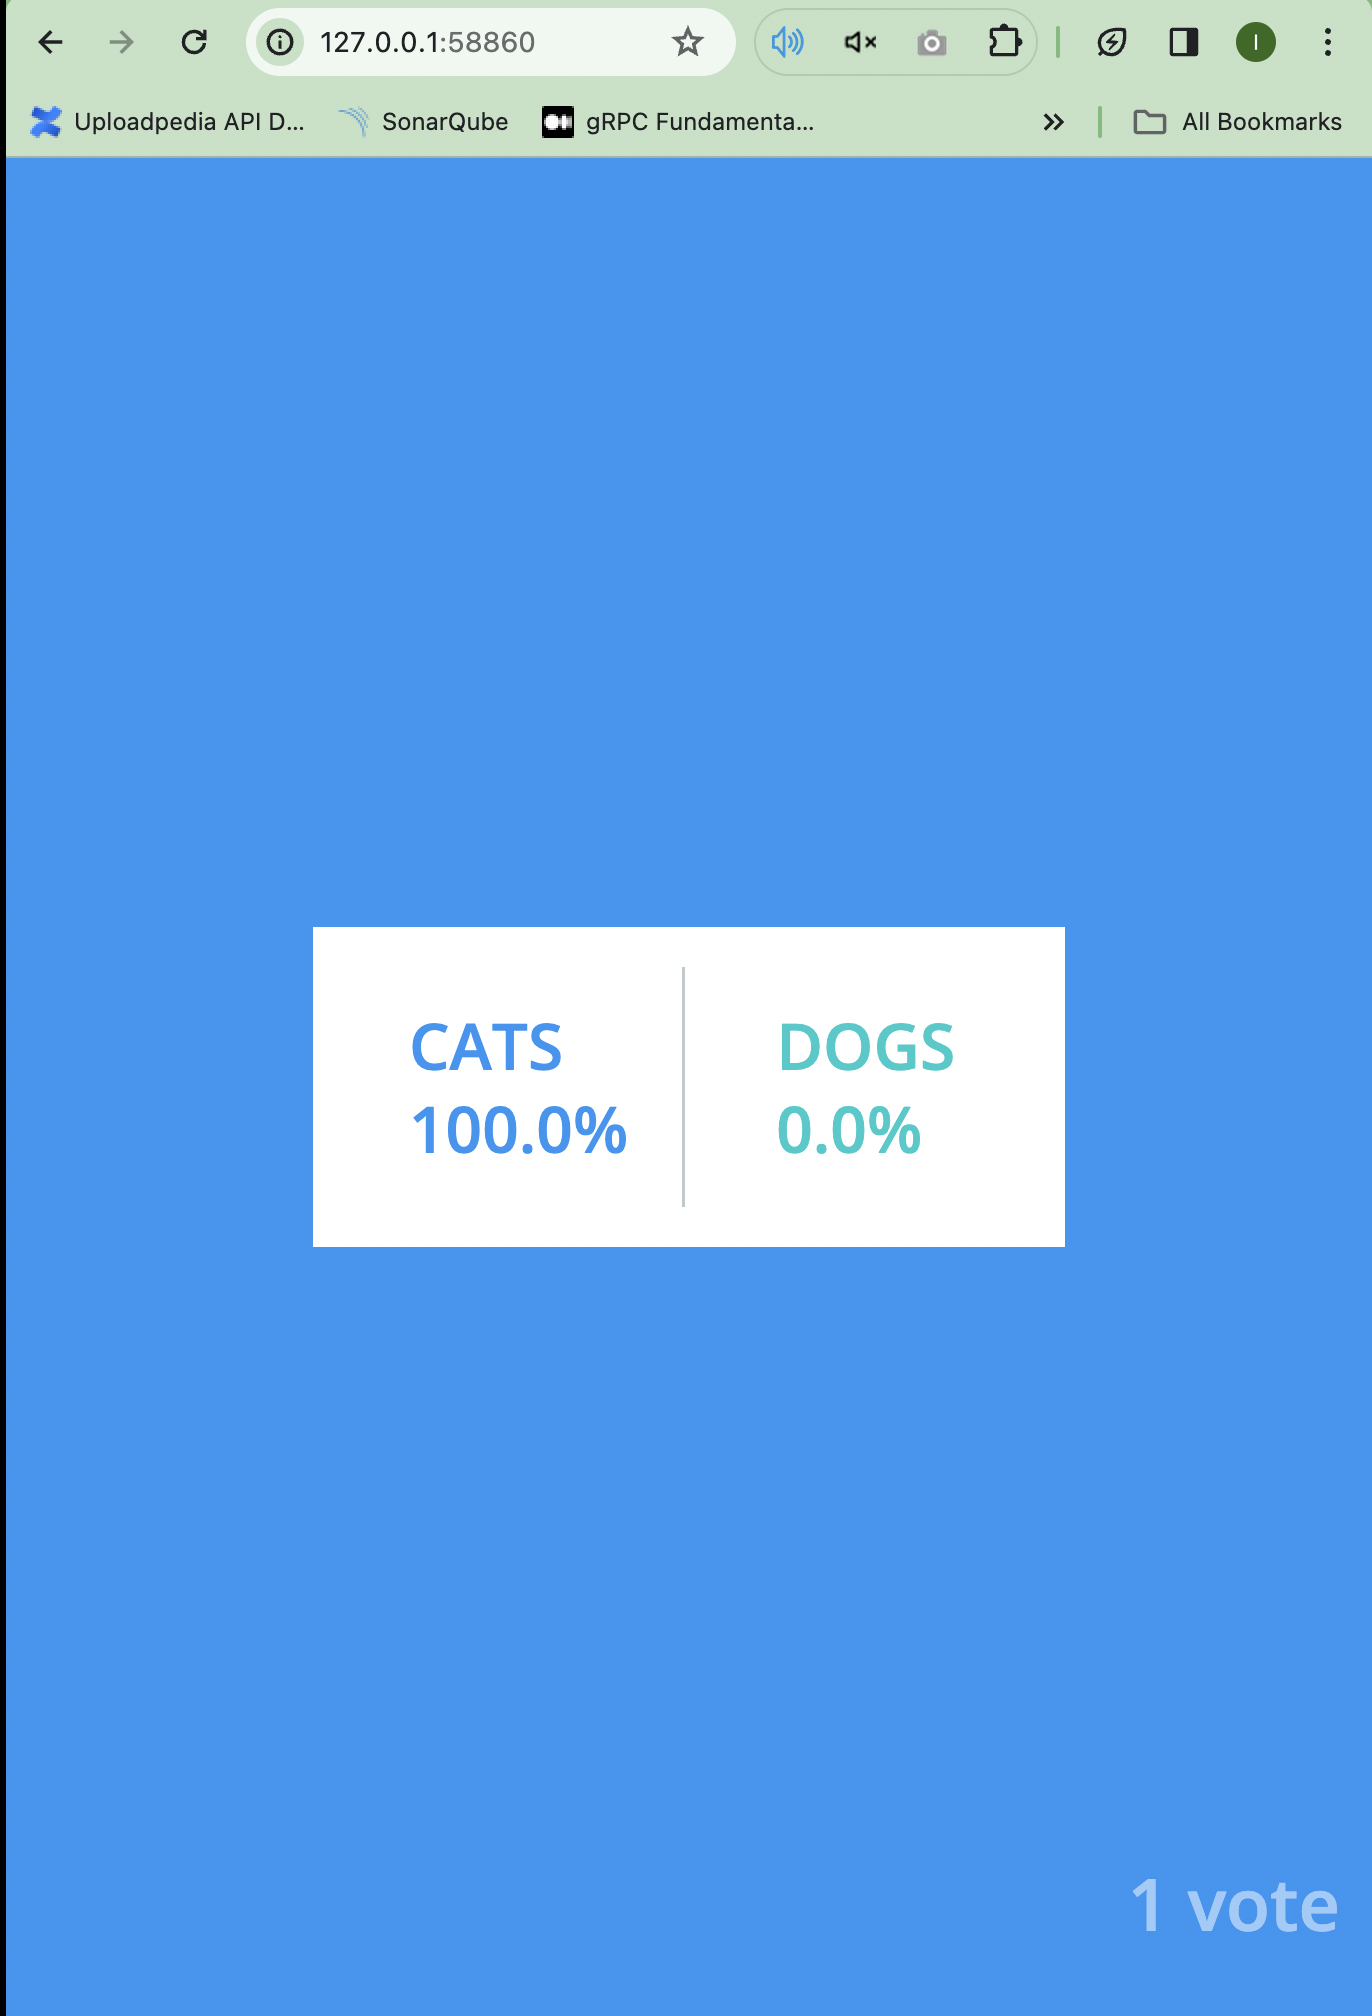
If we look and access it using a browser for the result-app service it will look like the image below.