


Kubernetes Service provides communication between components inside or outside the application. These Kubernetes Services will help connect applications to each other and connect to users as well.
For example, our application has groups that run from several parts, for example a frontend group or a backend group process or a third party group that are connected to communicate with each other with external data. With Kubernetes Services we can connect all groups connected to Kubernetes.
There are 3 types of Kubernetes Services, namely: a. NodePort, a service created for internal ports on Nodes.
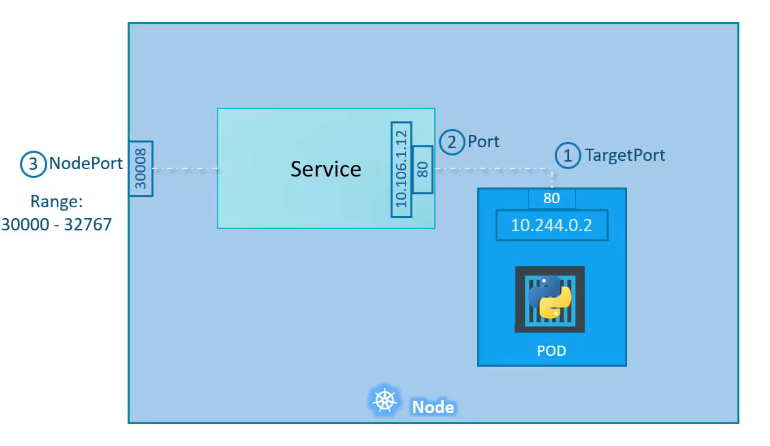
NodePort Implementation
The following is an example of blinding a service by implementing NodePort
 1apiVersion: v1
 2kind: Service
 3metadata:
 4  name: myapp-service
 5spec:
 6  type: NodePort
 7  ports:
 8    - port: 80
 9      targetPort: 80
10      nodePort: 30008
11  selector:
12    app: myapp
13    type: front-end
As seen in the YAAML file above, we get a new field Port which targets the node port and others.
Next, we try to create the service with the command below.
1➜ kubectl create -f code/services/service-nodeport-definition.yaml
2service/myaapp-service created
And we will see that when it is made it will look like below.
1➜ kubectl get services
2NAME             TYPE        CLUSTER-IP      EXTERNAL-IP   PORT(S)        AGE
3kubernetes       ClusterIP   10.96.0.1       <none>        443/TCP        24d
4myaapp-service   NodePort    10.101.173.39   <none>        80:30008/TCP   71s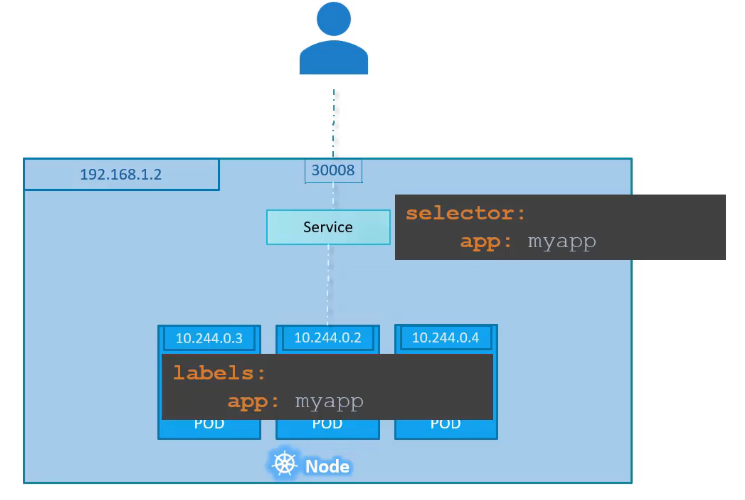
And when we use the nodeport for multiple nodes, the picture will be like below.

To see our service running with the URL that has been published by Minikube, we need to see the URL with the command below.
1➜ minikube service myapp-service --url
2http://127.0.0.1:50569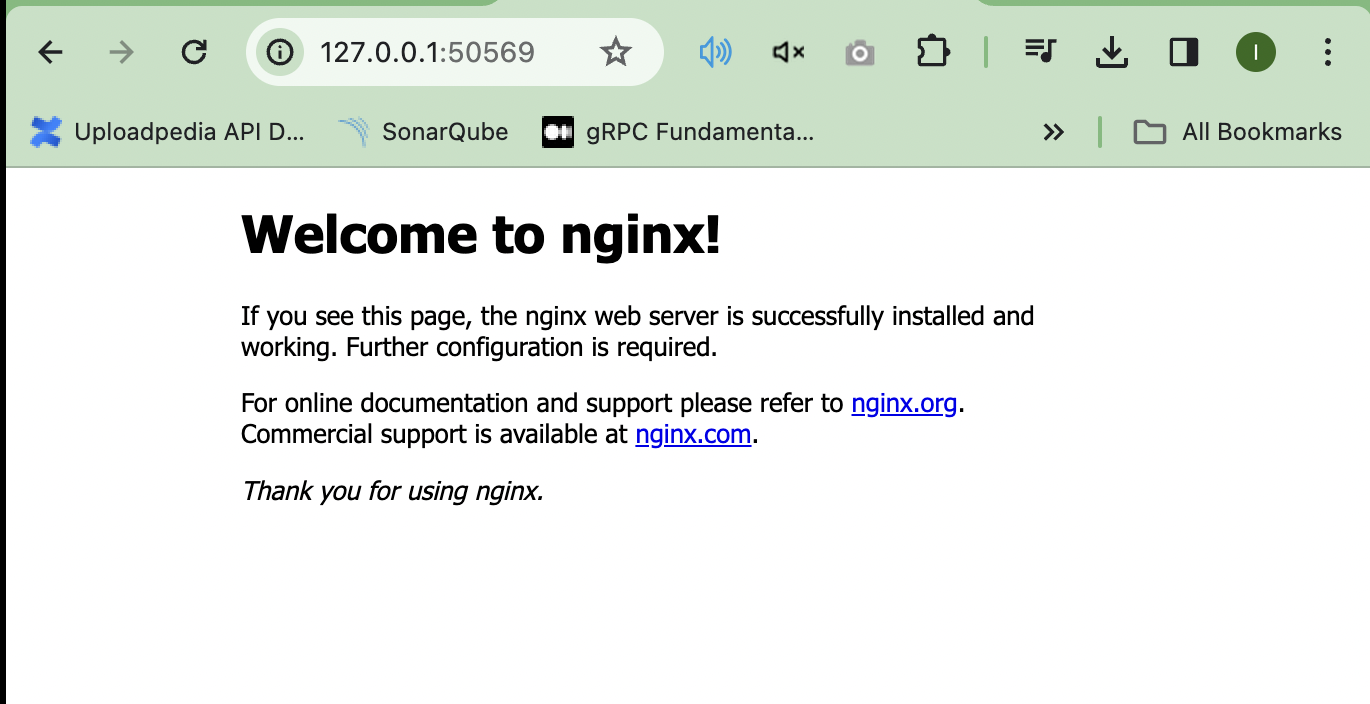
ClusterIP explanation
As explained briefly above, we can use ClusterIP to divide the IP address allocation so that it becomes a cluster that gathers together according to each other’s needs. For example, if we want to make the clusterIP something like backend, frontend, and redis as shown below.
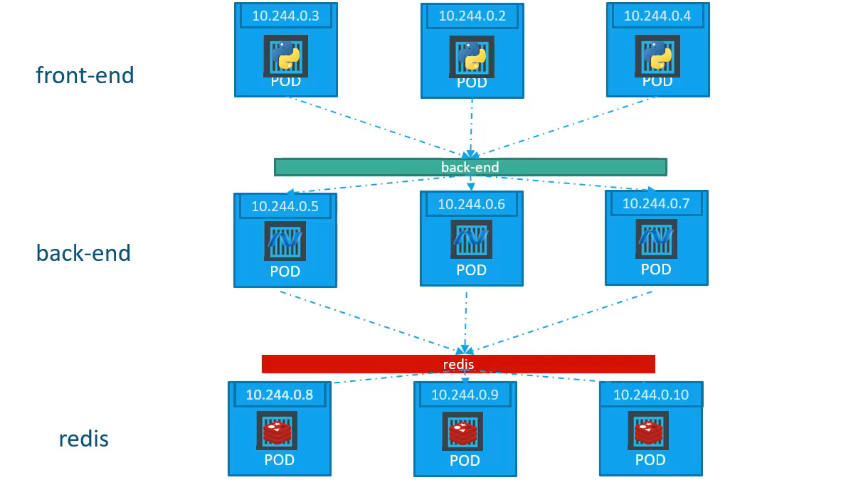
And how can we create the ClusterIP, here is an example of creating a YAML file.
 1apiVersion: v1
 2kind: Service
 3metadata:
 4  name: back-end
 5spec:
 6  type: ClusterIP
 7  ports:
 8    - port: 80
 9      targetPort: 80
10  selector:
11    app: myapp
12    type: back-end
then we create the service with the command below.
1➜ kubectl create -f code/services/service-clusterip-definition.yaml
2service/back-end created
And we will see whether the cluster we defined has been created using the command below.
1➜ kubectl get svc
2NAME            TYPE        CLUSTER-IP       EXTERNAL-IP   PORT(S)        AGE
3back-end        ClusterIP   10.97.219.53     <none>        80/TCP         7s
4kubernetes      ClusterIP   10.96.0.1        <none>        443/TCP        24d
5myapp-service   NodePort    10.106.237.142   <none>        80:30008/TCP   18m
LoadBalancer implementation
The last type is LoadBalancer, which is a type that can combine each node for each application that we have created. So how do we do it if we want to create a Loadbalancer? Look at the code below.
 1apiVersion: v1
 2kind: Service
 3metadata:
 4  name: myapp-loadbalancer
 5spec:
 6  type: LoadBalancer
 7  ports:
 8    - port: 80
 9      targetPort: 80
10      nodePort: 30009
then we create the service with the command below.
1➜ kubectl create -f code/services/service-loadbalancer-definition.yaml
2service/myapp-loadbalancer created
And we will see whether the cluster we defined has been created using the command below.
1➜ kubectl get svc
2NAME                 TYPE           CLUSTER-IP       EXTERNAL-IP   PORT(S)        AGE
3back-end             ClusterIP      10.97.219.53     <none>        80/TCP         8m45s
4kubernetes           ClusterIP      10.96.0.1        <none>        443/TCP        24d
5myapp-loadbalancer   LoadBalancer   10.99.140.200    <pending>     80:30009/TCP   21s
6myapp-service        NodePort       10.106.237.142   <none>        80:30008/TCP   27m